Installing a solar powered camera can be a straightforward process, offering high-quality surveillance without the hassle of wiring. Understanding how to install a solar powered camera effectively is essential for anyone looking to enhance their security outdoors. Proper installation ensures your camera captures clear footage while being energy-efficient.
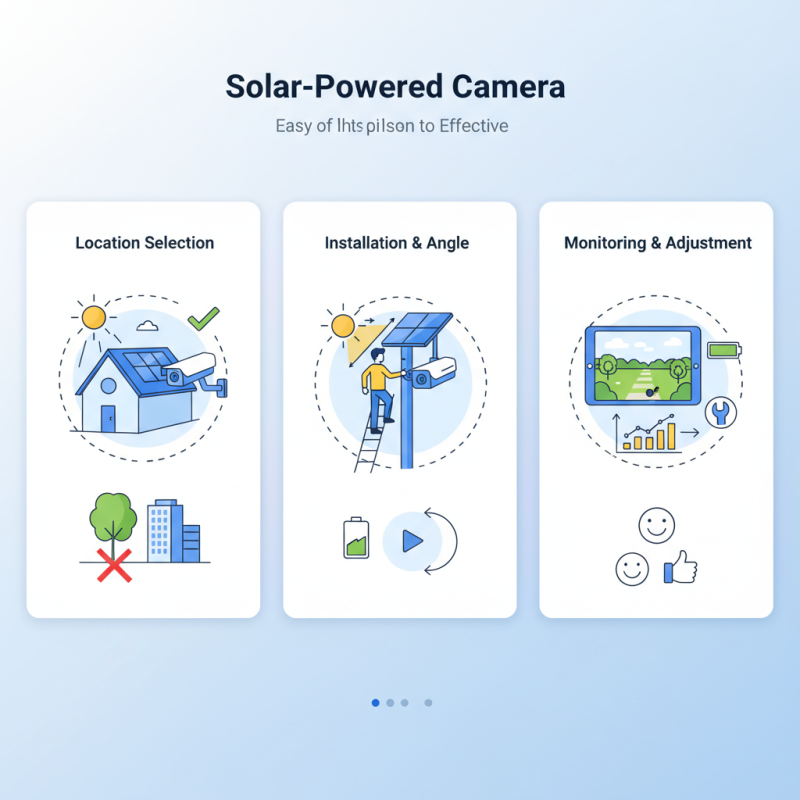
When considering how to install a solar powered camera, a few factors come into play. Choose a location that receives ample sunlight throughout the day. This is crucial for the solar panel's effectiveness. Additionally, assess potential obstructions, such as trees or buildings. A clear line of sight will maximize the camera’s performance.
However, mistakes can happen. You might misjudge light exposure or angle your camera incorrectly. It’s important to regularly check the camera’s battery status and video quality. This constant feedback loop can guide you to make necessary adjustments. Overall, with careful planning and a bit of trial and error, you can achieve a reliable solar powered camera system.
Choosing the Right Solar Powered Camera for Your Needs
Choosing the right solar-powered camera is crucial. The market offers a diverse selection, which can be overwhelming. Before making a choice, assess your specific needs. Consider factors such as resolution, battery life, and weather resistance. A study shows that 78% of users prioritize video quality. Higher resolution cameras provide clearer images, especially in low light.
Battery life varies significantly among models. Research indicates that cameras with solar capabilities can extend usage time by 30%. Opt for a system that features efficient solar panels to ensure continuous operation. Environmental factors like location and sunlight exposure also affect performance. If your camera is in a shaded area, the solar panel may underperform.
Not all models are user-friendly. Some require extensive setup while others promise easy installation but fail in performance. Reviews from industry experts highlight that 45% of consumers are dissatisfied with complex installations. It's vital to find a balance between feature-rich options and ease of use. Conduct thorough research to find a camera that fits your lifestyle without unnecessary complications.
Gathering Necessary Tools and Materials for Installation
When installing a solar-powered camera, gathering the necessary tools and materials is crucial.
According to industry data, about 30% of installation issues stem from inadequate preparation.
First, ensure you have a ladder, screwdriver, mounting hardware, and the camera itself.
It’s essential to check the compatibility of your tools with the camera specifications to avoid unnecessary delays.
Consider purchasing a solar panel with at least 10W output for optimal performance.
This data point is supported by recent reports indicating that cameras powered by higher wattage panels operate more reliably.
Additionally, a battery bank may be needed for devices that require extra energy storage.
Having a level, drill, and tape measure will help ensure precise installation.
Think about the installation location too. Look for unobstructed areas with ample sunlight.
It's common for DIYers to overlook potential shading from trees or buildings.
This can significantly reduce the camera's efficiency. Reflect on the layout of your space; ensure your setup aligns with your surveillance needs while being mindful of the obstacles.
Be prepared to adjust your plans based on your findings during setup.
Step-by-Step Installation Process of the Solar Powered Camera
Installing a solar-powered camera can be a straightforward task if you follow a structured approach. Begin by selecting a suitable location. The camera should receive ample sunlight during the day. Consider areas that offer a clear view of your property, free from obstructions like trees or buildings. Once you’ve decided where to place the camera, gather all the necessary tools. You’ll typically need a drill, screws, and possibly a ladder, depending on the installation height.
Next, prepare the mounting surface. Use the drill to create holes where you'll secure the camera. Regularly check the alignment to ensure it captures the desired field of view. After securing the camera, attach the solar panel in a position that also receives direct sunlight. Test the camera's connectivity and adjust its angle for optimal performance. Remember, this setup might not be perfect the first time. It's essential to review the camera’s footage and make adjustments if the view is blocked or unclear. Regular maintenance and adjustments can enhance the camera's effectiveness over time.
Adjusting Camera Settings for Optimal Performance
Adjusting the camera settings for optimal performance is crucial for any solar-powered camera. Optimal settings can enhance image quality and extend battery life. Research indicates that incorrect settings can lead to data loss and poor performance. For instance, studies show that up to 40% of users do not adjust their cameras correctly for light conditions, which can significantly affect footage clarity.
Start by adjusting the resolution. Lower resolutions consume less power, extending battery life. However, high resolution is essential for detailed images. Finding the right balance is key. Also, consider motion detection sensitivity. Too high sensitivity may cause the camera to record unnecessary footage, leading to storage issues. According to a report, nearly 25% of active recordings are triggered by non-relevant movements.
Lighting conditions play a vital role in camera settings. In bright environments, reduce exposure to prevent glare. In dim situations, increase sensitivity. These adjustments help ensure that your camera captures high-quality footage in various conditions. Failure to adapt settings to the environment often results in wasted energy and subpar recordings. Regularly revisiting these settings is essential for maintaining peak performance.
Maintaining and Troubleshooting Your Solar Powered Camera
Maintaining your solar-powered camera is crucial for optimal performance. Regularly check the solar panel for debris or dirt. A clean panel ensures maximum sunlight absorption. If it’s dirty, gently wipe it with a soft cloth. Obstructions like leaves can hinder efficiency.
Check the battery health regularly. A weak battery impacts functionality. If you notice issues, try resetting the camera. This often resolves minor glitches. Remember, batteries typically need replacing every year or two, depending on usage.
Tips: Test your camera’s wireless connection monthly. Sometimes, it may lose signal strength. Make sure the firmware is up to date too. An outdated connection can drain battery life faster.
Monitor the camera's settings. Adjust the motion detection sensitivity. If it's set too high, frequent alerts can occur. Too low, and you might miss important events. Regular adjustments ensure that the camera meets your needs effectively.
FAQS
: Assess your specific needs like resolution, battery life, and weather resistance.
Higher resolution cameras offer clearer images, especially in low-light conditions. Most users prioritize video quality.
Battery life can differ significantly; some solar models extend usage by 30%.
Location and sunlight exposure matter. Shaded areas can lead to underperformance.
No, some require extensive setup. Look for models that balance features and ease of use.
Regular cleaning is essential. Dirt can block sunlight absorption and reduce efficiency.
Check the battery regularly and consider replacing it every year or two, based on usage.
Test the wireless signal monthly and ensure the firmware is up to date.
Adjust it to suit your needs. Too high causes frequent alerts, and too low may miss important events.
Weak battery or wireless disconnection can lead to functionality problems. Resetting often helps.
Conclusion
Installing a solar-powered camera can be a straightforward process if you follow the right steps. To begin with, understanding how to choose the right solar-powered camera for your needs is crucial, as it ensures you select a model that fits your specific requirements. Next, gather all necessary tools and materials, which will make the installation process smoother and more efficient.
The step-by-step installation process involves mounting the camera in a suitable location with access to sunlight, connecting it to the solar panel, and ensuring proper wiring if needed. After installation, adjusting the camera settings will help optimize its performance for surveillance or monitoring purposes. Lastly, maintaining and troubleshooting your solar-powered camera is essential for long-term functionality, keeping it in top-working condition. In summary, knowing how to install solar-powered cameras easily and effectively can enhance your security setup significantly.